
https%3a%2f%2fwww.ties.com%2fassets%2fimg%2fhow-to-tie-a-tie%2fthumbs%2ftrinity-knot.jpg&description=
How to Tie the How%20To%20Tie%20A%20Trinity%20Knot%20%7c%20Ties.com" class="social-btn js-social-btn pinterest" target="pin_tab" rel="nofollow">
Share on Pinterest
How to Tie the How%20To%20Tie%20A%20Trinity%20Knot%20%7c%20Ties.com" class="social-btn js-social-btn pinterest" target="pin_tab" rel="nofollow">
Share on Pinterest
https://www.instagram.com/tiesdotcom/" class="social-btn instagram padding" target="in_tab" rel="nofollow">
Instagram
More Knots
About the Trinity the
Trinity Knot
About the 4/5
1">
 trinity-knot-tying-instructions-01.png" class="instructions-img lg" alt="Step 1">


 1" class="step">
 trinityTrinity Knot Step-by-Step Guide
-knot-step-by-step-
0
trinityTrinity Knot Step-by-Step Guide
-knot-step-by-step-
0

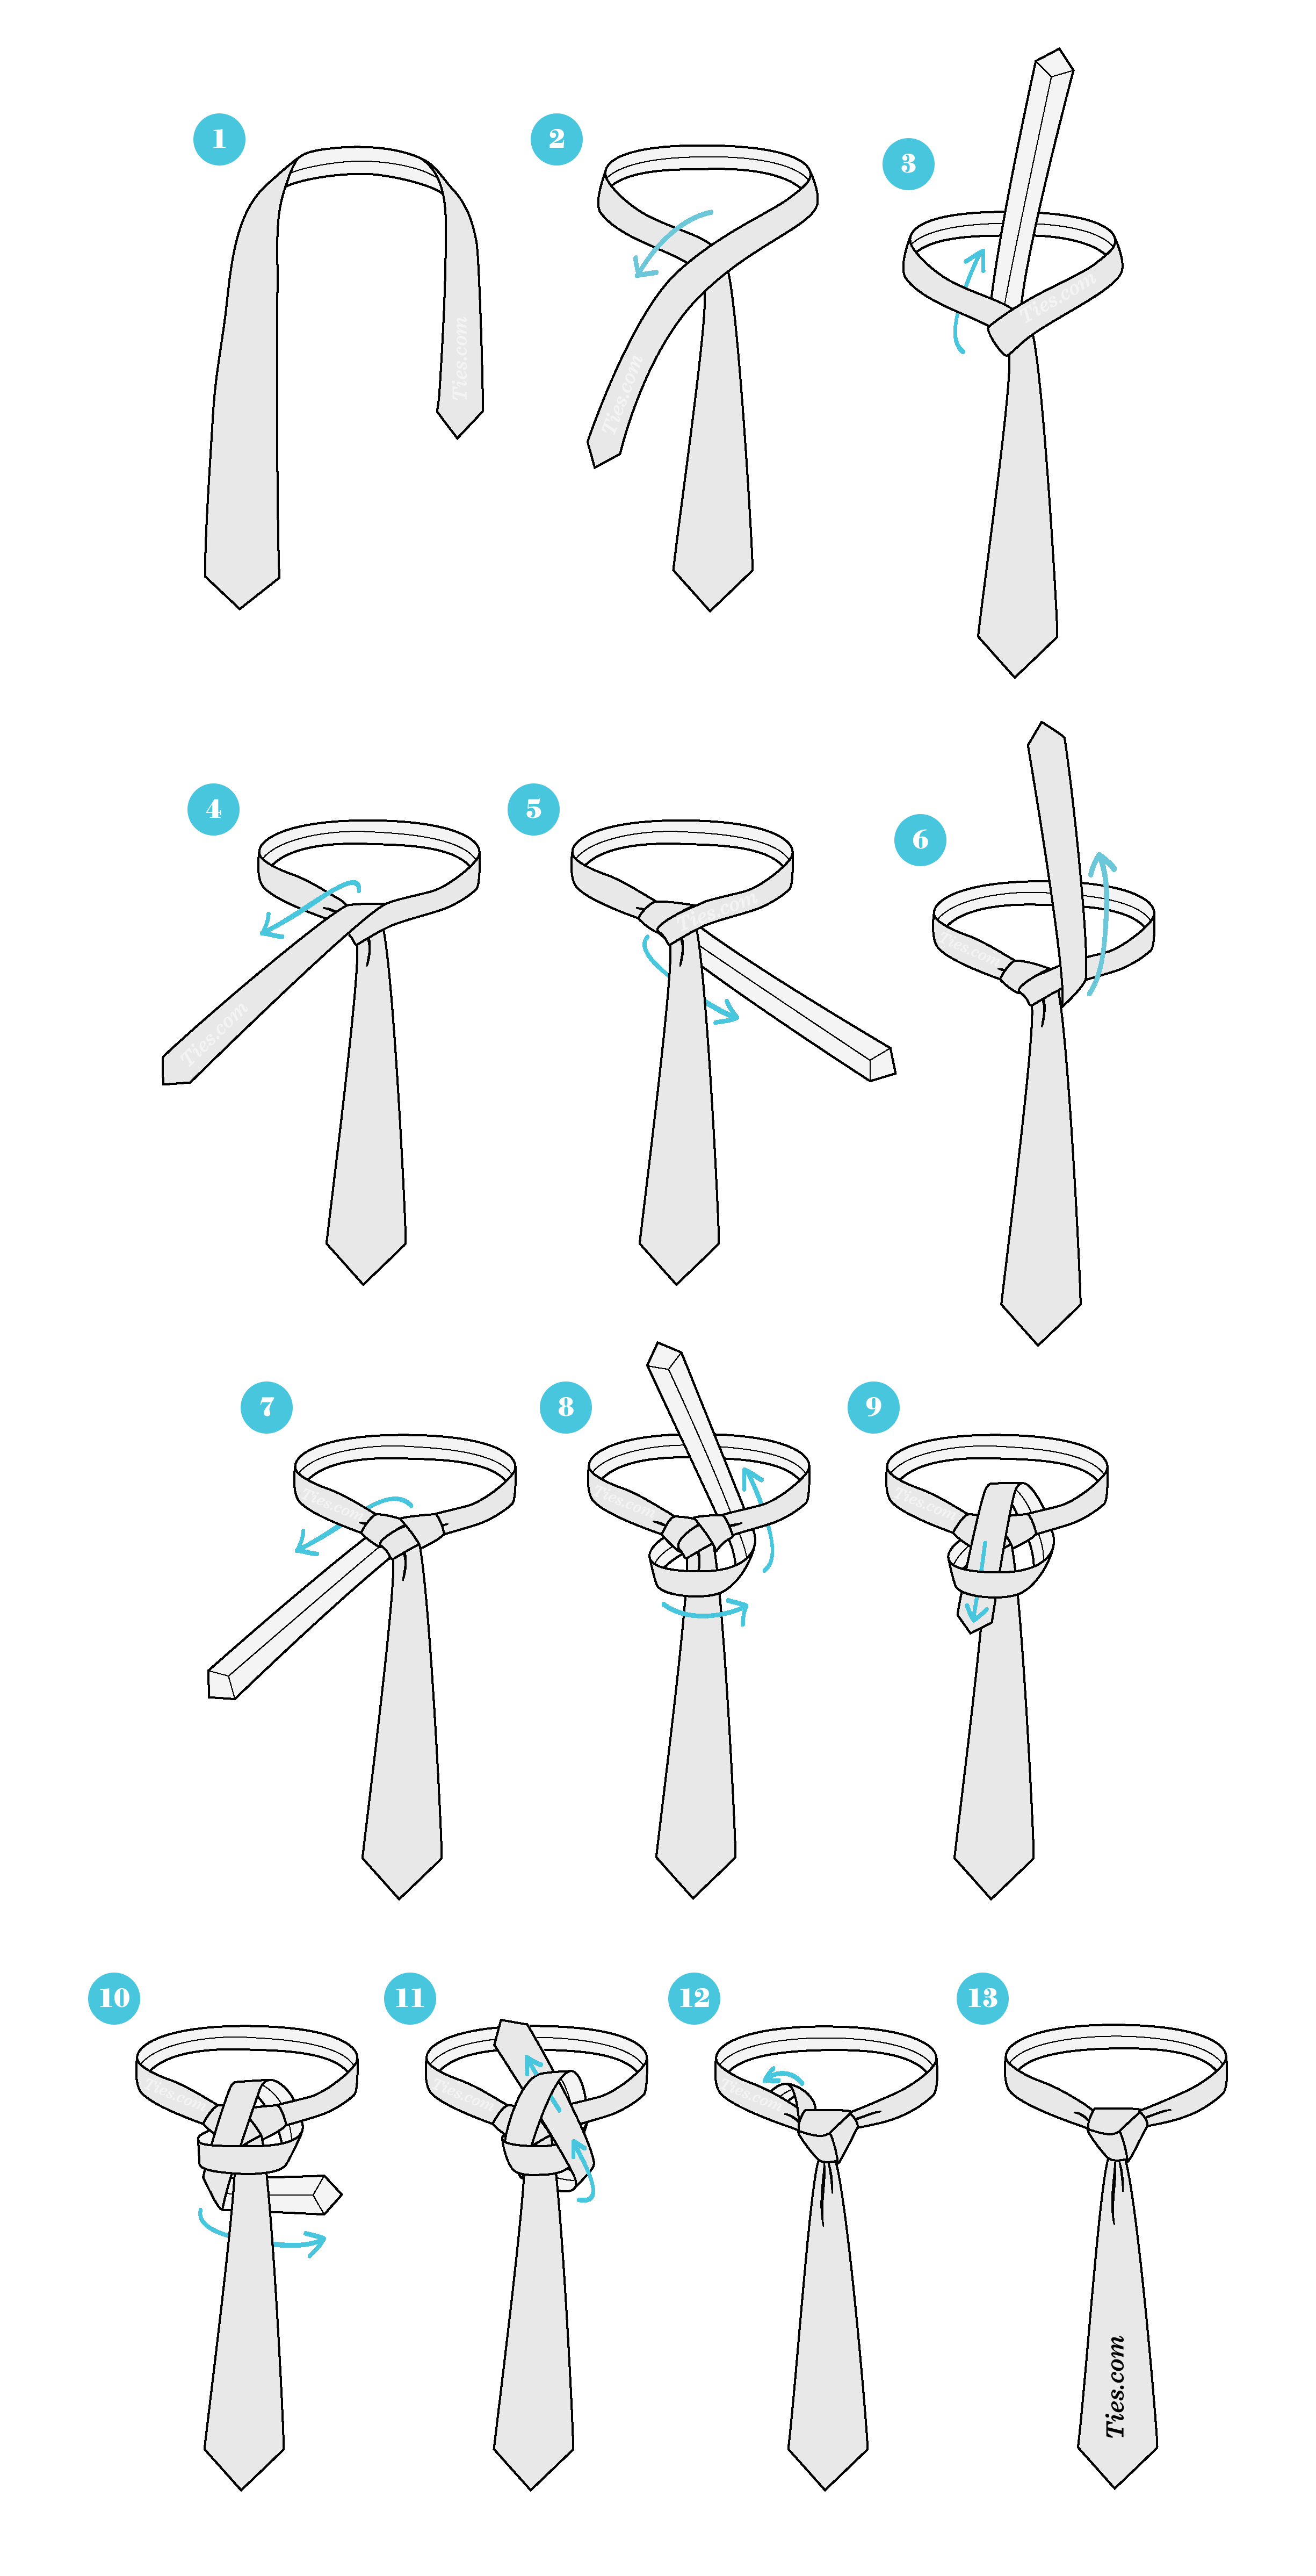
STEP 1
trinity-knot-step-by-step-0Start with the wide end of the tie on the left and the small end on the right. The tip of the wide end should
rest at the top of your belt buckle. Only move the active (small) end.
STEP 1
trinity-knot-step-by-step-Start with the wide end of the tie on the left and the small end on the right. The tip of the wide end should
rest at the top of your belt buckle. Only move the active (small) end.
0

STEP 2
Over the wide end to the left.

STEP -knot-step-by-step-2
0Over the wide end to the left.
3.jpg" alt="Step
STEP 3" class="step">
 Up into the neck loop from underneath.
trinity
-knot-step-by-step-

STEP trinity3
-knot-step-by-step-Up into the neck loop from underneath.
0
STEP 4" class="step">
 Down to the left.

STEP 5.jpg" alt="Step 45" />
STEP 5
Down to the left.
Around the back of the wide end to the right.
About the Trinity the
Trinity Knot
1">
About the 4/5
trinity-knot-tying-instructions-01.png" class="instructions-img lg" alt="Step 1">
1" class="step">
trinityTrinity Knot Step-by-Step Guide
-knot-step-by-step-
0
STEP 1
trinity-knot-step-by-step-0Start with the wide end of the tie on the left and the small end on the right. The tip of the wide end should
rest at the top of your belt buckle. Only move the active (small) end.
STEP 1
trinity-knot-step-by-step-Start with the wide end of the tie on the left and the small end on the right. The tip of the wide end should
rest at the top of your belt buckle. Only move the active (small) end.
0
STEP 2
Over the wide end to the left.
STEP -knot-step-by-step-2
0Over the wide end to the left.
3.jpg" alt="Step
STEP 3" class="step">
Up into the neck loop from underneath.
trinity
-knot-step-by-step-
STEP trinity3
-knot-step-by-step-Up into the neck loop from underneath.
0
STEP 4" class="step">
Down to the left.
1" class="step">
trinityTrinity Knot Step-by-Step Guide
-knot-step-by-step-
0
STEP 1
trinity-knot-step-by-step-0Start with the wide end of the tie on the left and the small end on the right. The tip of the wide end should
rest at the top of your belt buckle. Only move the active (small) end.
STEP 1
trinity-knot-step-by-step-Start with the wide end of the tie on the left and the small end on the right. The tip of the wide end should
rest at the top of your belt buckle. Only move the active (small) end.
0
STEP 2
Over the wide end to the left.
STEP -knot-step-by-step-2
0Over the wide end to the left.
3.jpg" alt="Step
STEP 3" class="step">
Up into the neck loop from underneath.
trinity
-knot-step-by-step-
STEP trinity3
-knot-step-by-step-Up into the neck loop from underneath.
0
trinityTrinity Knot Step-by-Step Guide
-knot-step-by-step-
0
STEP 1
trinity-knot-step-by-step-0Start with the wide end of the tie on the left and the small end on the right. The tip of the wide end should
rest at the top of your belt buckle. Only move the active (small) end.
STEP 1
trinity-knot-step-by-step-Start with the wide end of the tie on the left and the small end on the right. The tip of the wide end should
rest at the top of your belt buckle. Only move the active (small) end.
STEP 2
Over the wide end to the left.
STEP -knot-step-by-step-2
0Over the wide end to the left.
STEP 3" class="step">
Up into the neck loop from underneath.
STEP trinity3
-knot-step-by-step-Up into the neck loop from underneath.
STEP 4" class="step">
Down to the left.
STEP 5.jpg" alt="Step 45" />
STEP 5
Down to the left.


STEP 6trinity
Up to the center, towards neck loop.

STEP 5
7.jpg" alt="Step 7" />
STEP Around the back of the wide end to the right.
Through the neck loop and down to the left.


 trinity-knot.jpg" class="knot-thumb" alt="Trinity Knot">


 balthus-knot.jpg" class="knot-thumb" alt="Balthus Knot">


 Eldredge Knot">