https://www.ties.com/primg/gray-blue-microfiber-optometrist-tie-249493-505-440-0.jpg">
$38.50
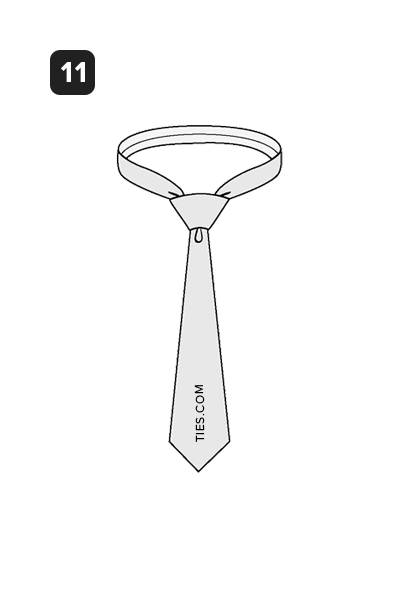
  • _Biohazard Anthrax Black Tie_
    $75 $20
  • _Climate Change Red Tie_
    $75 $20
  • _Medical Supplies Lime Green Tie_
    $38.50 $20
  • _Medical Supplies Navy Blue Tie_
    $38.50
  • _DUST MITES Blue Tie_
    $75 $20
  • _Eye Chart Black Tie_
    $38.50
  • _Real Dentists Wear Plaid Gray Tie_
    $70
  • _Heart Beats Navy Blue Self-Tie Bow Tie_
    $38.50
  • _Stem Cells Navy Blue Tie_
    $75 $20
  • _Biohazard Black Tie_
    $75 $20
  • _Stem Cells Black Tie_
    $75 $20
  • _Doctor's Sayings Black Tie_
    $38.50 $15
  • _Autism Awareness Puzzle Multicolor Extra Long Tie_
    $38.50
  • _Pill Poppin' White Skinny Tie_
    $38.50 $15
  • _Never Leave Your Stethoscope Red Tie_
    $38.50
  • _Dentists' Teeth Black Self-Tie Bow Tie_
    $38.50
  • _Ouch! Navy Blue Tie_
    $70 $35
  • _Trust Me, I'm a Doctor Red Tie_
    $70
  • _Pill Poppin' White Tie_
    $38.50
  • _Medical Professional Black Tie_
    $38.50
  • _Dentists' Teeth Black Tie_
    $38.50
  • _MEDICAL PROF. XL Black Extra Long Tie_
    $38.50 $20
  • _Dentist Approved Blue Tie_
    $38.50
  • Medical & Dental Neckties


    Here at Ties.com we believe in opening up the world of style to everyone. Medical professionals are no exception. After all, they do happen to keep us alive and healthy; and they save lives when need be. Ties.com is here to return the favor on behalf of humanity -  thank you, dentist, doctors, and the like. We have an ample supply of doctor ties, dentist ties, and optometrist ties to liven up your wardrobe.

    These ties will work every day of the week - Monday, Humpday, casual Friday - you name it! Novelty ties are the new black for many. We have you covered from caduceus ties all the way to ties featuring eye-chart ties. Dress them however you like. Whether it's a suit or with jeans, one of our ties will add a subtle wink to your down-to-earth personality. Either way you wear them, we guarantee that both patients and staff will appreciate your outfit.

    Whatever your tie (or bow tie) step away from the norm, show your patients that medical professionals can also be witty, and take the scary out of visiting your office.

    Not a medical professional? Don't fret, we have you covered. We have a variety of occupational ties for professionals in every field!
    Back To Top Go Back To Top
    1 Item Added to Your Bag
    Your Cart:
    Subtotal:
    CONTINUE TO CART
    Filter By
    CLEAR
    How To Tie A Windsor Knot | Ties.com
    Close
    Free Shipping & Easy Returns on U.S. orders over $65* Learn More
    More Knots

    How to Tie the Windsor Knot

    About the Windsor Knot

    Although the Duke of Windsor never specifically used the Windsor knot, he did favor a wide triangular knot. In actuality, the Duke achieved his trendsetting look by tying a Four-in-Hand with specially made wide and extra thick ties. The Windsor knot was invented by the public as a way to imitate the Duke's knot style. There are several derivatives of the Windsor that are all referred to by the same name. The Windsor delivers a symmetrical and solid triangular knot that works best with a spread collar. This knot is also mistakenly referred to as the “Double Windsor” knot.
    KNOT SIZE 4/5
    SYMMETRY 5/5
    DIFFICULTY 2/5
    SELF-RELEASING

    The Windsor Knot Tying Instructions

    Step 1 Step 2 Step 3

    Windsor Knot Step-by-Step Guide

    Step 1

    STEP 1

    Start with the wide end of the tie on the right and the small end on the left. The tip of the small end should rest slightly above your belly-button (this will vary depending on your height and the length & thickness of your tie). Only move the active (wide) end.
    Step 2

    STEP 2

    Wide end over the small end to the left.
    Step 3

    STEP 3

    Up into the neck loop from underneath.
    Step 4

    STEP 4

    Down to the left.
    Step 5

    STEP 5

    Around the back of the small end to the right.
    Step 6

    STEP 6

    Up to the center, towards neck loop.
    Step 7

    STEP 7

    Through the neck loop and down to the right.
    Step 8

    STEP 8

    Across the front to the left.
    Step 9

    STEP 9

    Up into the neck loop from underneath.
    Step 10

    STEP 10

    Down through the loop you've just created in the front.
    Step 11

    STEP 11

    Tighten the knot by pulling down on the wide end. Slide the knot up & adjust.
    Our Best Kept Secret
    Get access to secret subscriber-only
    discounts when you join our newsletter.
    Instant Access